Beach Decor – Reclaimed Wood Whale Art

This week I share our current summer mantel. I thought today I would share one of my previous summer mantels with one of my favorite projects.
But this is really not about a mantel.
It is about several stories coming together and resulting in a reclaimed wood whale.
And this whale is special. She even has a name.
Glenda the Happy Whale.

And while she is very happy living on my mantel for now, this is her temporary home. She is really destined to live on Long Beach Island, NJ.
Last year during Hurricane Sandy, my parents small beach placed took on so much damage that it had to be gutted. And while they did get some insurance coverage, the rebuild has far exceeded what they received. So, I am trying to help out by creating budget friendly items – and Glenda is the first one.

And, because as always, I am a sentimental girl, I used the wood from my Grandfather’s house to build her.
Two destroyed homes coming together to make a happy whale. I know a stretch. But like I said, I am a sentimental girl.

In the meantime, she is bringing us some summer happiness. When she is in LBI, she will hang on the wall, but Hubby made a small stand for her for now. I simply added some beachy accessories and covered the fireplace opening with my stenciled barn wood.
She actually was quite easy to build and as long as you are comfortable using a jigsaw, you can make one too. Here is how I did it:
Step 1:
Draw your shape on a piece of 1/4 inch plywood. We used scrap that we had laying around. I drew it freehand with a picture as a guide. When I didn’t like something, I just redrew and kept track of the lines I liked. I did a whale, but really this process could be used for any shape.This is what mine looked like once it was all cut out.
Step 2:
Using a jigsaw or miter box, cut your scrap wood down so that it falls at least 1 inch wider all the way around the template. I went straight across where the tail curved it and just added shorter pieces at the end of the tail.
Our wood was tongue and groove but that is not necessary. Any type of scrap wood will work – even pallet pieces. The approach here is more of a “use what you have”.
Step 3:
Place another piece of plywood over the top of the scrap wood to steady it and flip the whole thing over so that the template is now on top. <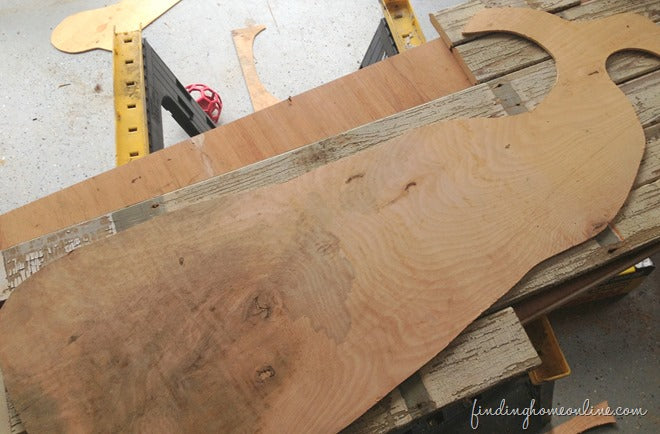
Flip over the template and apply wood glue generously to the backside. Place it back down on the backside of the scrap wood.
Nail in small brad nails throughout adding extra security to each of the boards. We also chose to add some small screws to the edge pieces and the tail so it was extra secure. Place something heavy on top to weight it down and leave over night to dry (or at least several hours).
Step 4:
Using the plywood whale as your template, cut the the scrap wood into the shape of the whale.
Step 6:
Use a palm sander to smooth all of the rough edges. I also ran it along the front edge to round the edges.
Step 7:
This step is a personal choice. I chose to coat it all with a dark stain that was quickly wiped off. Then I applied a coat of clear wax. After that, I decided it was a little too dark and shiny so I used steel wool to knock it back down to the original color. This process kept enough wax on it to keep it sealed and smooth.
I also stained the back and edges since they were raw wood.
This whole process was right up my alley – nothing has to be perfect and precise. I love the way it came out so much, I think I might use the same process for some other projects.

And when our sweet friend Glenda has made it to her new home, I will be sure to share pictures.
(udpate - you can see her by clicking here - Summer Beach House)
Wishing a great day and many blessings.
Thanks for reading!

