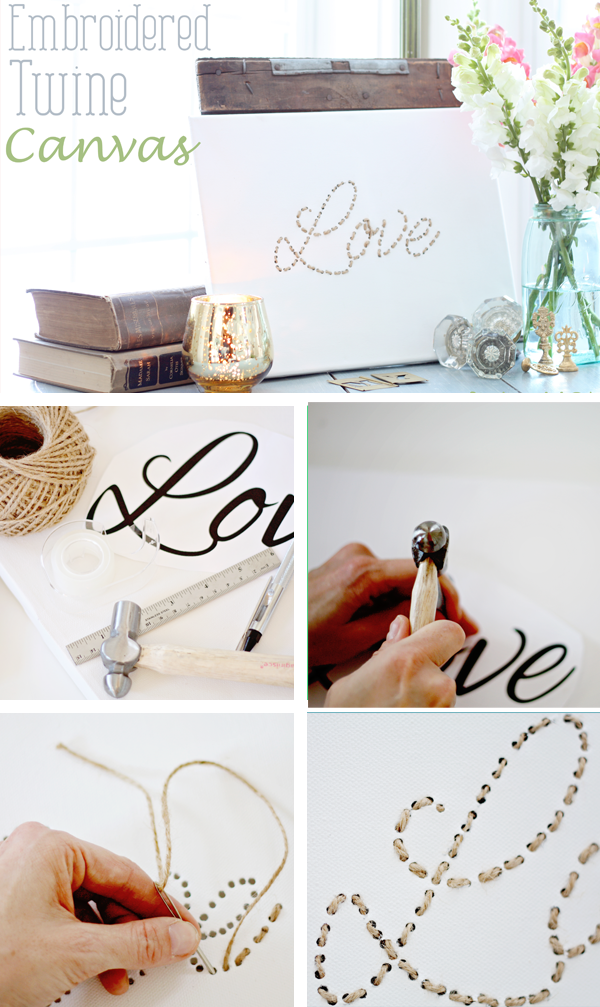
Love: Twine Embroidered Art Canvas Tutorial

When I met my husband, we were babies.
Okay, maybe not babies – but I met him at 18, started dating at 19 and married him at 23.
I have always said the best decision I have ever made was to marry him.
I remember the exact moment I realized.
I was on an Amtrak train in Connecticut going through the Naval shipyard.
And I instantly realized - “I want to spend the rest of my life with him.”
And that was it – we both just knew.
So we finished college – okay, he kept going to college forever – but I finished and we planned and now here we are.
And 18 years later, we have two children and a happy life together.
We are partners. And he is my best friend – and that is the best part.
Life is busy – we don’t make big Valentine’s Day plans, or even exchange gifts.
But that doesn’t mean I like the day to go by without being sentimental and taking the time to appreciate our…Love.
So this is how you make your own twine embroidered canvas…
Materials:
- Twine
-Canvas – I kept mine white, but you could paint it however you choose.
- A ruler
-Tape
- A print out of the words or pictures, or whatever you choose to embroider.
- Paper punch
- Smaller hammer
- Metal stamping plate
-Small scissors
- Tapestry needle
Step 1: Place the stamping plate under the canvas – specifically where you are stamping. Keep moving it along with the pattern you are stamping.
Be sure that the plate is tight to the underside of the canvas. If there is space in between the plate and the canvas, there is a strong likelihood it will tear. Some canvases are thicker and would require the plate to be lifted higher.
Step 2: Place your print out on the canvas and tape it into place. Using your paper punch and small hammer, begin punching holes in the pattern. Keep the spacing even and not overlapped.
This is what it will look like when you complete the pattern. I tapped each hole about 5 times.
Step 3: Remove the paper printout and admire your results! Not all of the holes will have gone through unless your really beat the tar out of it. Push the “hanging chads” through and snip with a small pair of scissors from the backside.
Step 4: Loop your twine through the needle and knot the end.
Step 5: Starting from the backside, following the basic stitches through the whole image. When you have a break, just move across from the backside or knot from the back and start in a new spot. If you end up not having enough holes to end from the backside, add another hole.
There are a lot of options for this – and I am looking forward to trying it with a picture instead of words.
But until them, I am just going to enjoy a little love in my family room.

Thanks so much for reading!

