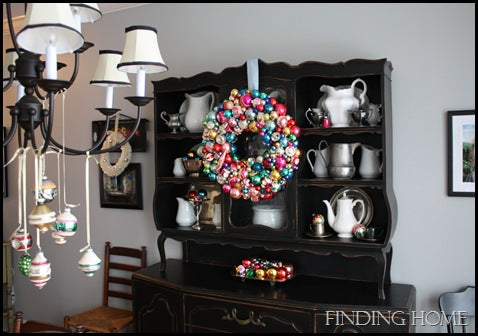
Ornament Wreath
There is a little bit of snow falling this morning. This has changed the light such that I could finally take some decent pictures of my ornament wreath.
As I mentioned the other day, this wreath took my almost five years to make.
It all started back a while ago when my dear friend Kathy asked me to start looking for vintage ornaments for wreaths she made with her sister. After passing on several boxes to her, I saw one of her wreaths for the first time. Five years ago, or so, I began collecting ornaments for myself. Finally, in August of 2009, I visited her with ornaments in hand and she taught me how to make it. We spent all day working on it.
Then, we got up in the morning and headed to our dear friend Julie’s house. She had just moved back from Hawaii (woo hoo!) to Massachusetts and was in her home just a day or two. We arrived and the moving men were there. We parked the cars and went to work. We worked all day and well into the night. A very HOT day and a very HOT night. With my poor little wreath sitting in a VERY HOT car.
As you can imagine, this wreath is put together with hot glue. The entire thing came apart. Sniff, sniff, AGGGHHHH!
Last year, we were confined to our basement for Christmas due to renovations, so the wreath did not make it out.
Finally, Friday night I paid my beautiful wreath all the love and respect it deserves. It is now happily hanging in my dining room.
I also hung some favorites from the chandelier.
I do not have pictures to show you how to make this wreath. However, I am sure you have seen these before and it follows the basic techniques of wreath making. The specific details are:
-
We used a grapevine wreath form
-
You need a LOT of ornaments to complete a wreath of this size.
-
When you start, build a foundation of ornaments around the center and outside perimeters.
-
Everything is hot glued at each “touch point” to another ornament or the wreath form itself.
-
You need a LOT of glue sticks. I used hot glue for the whole project.
-
About 95% of my ornaments are vintage. However, if you do not have that many, or any at all for that matter, check out my tutorial for making new ornaments look vintage.
If you choose to undertake a project like this, or a similar one, please remember these important details:
-
These wreaths can not be hung by a fireplace or heating vent/source. Heat puts it at risk to loosen your glue and cause damage to already fragile ornaments
-
Do not store these wreaths in an attic or place that the temperatures get very high at any point of the year.
-
Although the individual ornaments are light, when it is all together, this is pretty heavy. I have heavy wire behind the ribbon that is attached to the wreath and a nail on top of the hutch. If this wreath falls, it is pretty much done.
-
Last but not least, do not leave them in a hot car while you help your friend move!
I did loose a couple of ornaments in the process of putting this together because they are so fragile. If you have an ornament that is very special to you, I would suggest displaying it in another way and not run the risk of damage by using it in the wreath.
Have a great day!Linking up at Centsational Girl Holiday Party
I am also sharing this project at

