Upcycled Vintage Door Beverage Bar Station
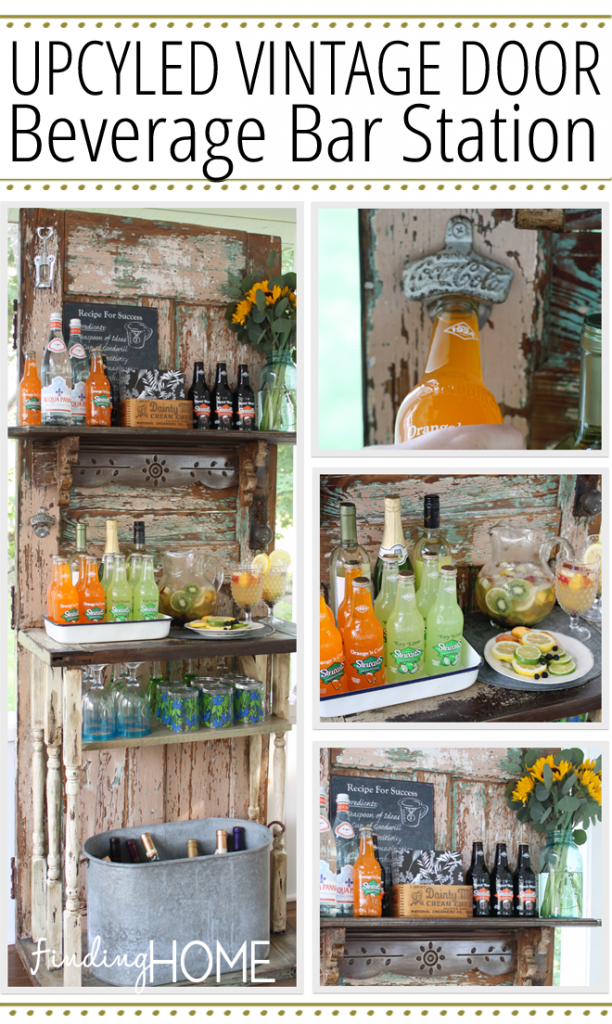
Today, I am sharing an upcycled vintage door beverage bar.
So the summer weather is winding down in our area here. The windows are open and the air is letting us know it is coming to an end.
But that doesn't mean I am ready to go inside yet. I am hoping to still use our porch into the fall, just start to wrap ourselves in quilts and blankets. For the past two years since we have had our porch, we were hit with a hurricane at the end of the summer season. We had to quickly "batten down the hatches" and get ready for the storm. We closed up early and didn't open again till spring.
This year, I am really hoping to be able to use the space well into the fall, have friends over, share meals. And what better way to to do that then with a fun beverage station.
Technically, this could also be considered a potting station, but I am just being honest here, for us, it is a beverage bar. It is perfect for our screened porch. Every time we had people over, I was bringing a folding card table out here for drinks. Not only did it not look cute, but it was always an awkward height to serve from.
Now, we have the perfect space to serve drinks for the whole crowd.
I added a tray to the top to corral some sodas.
And a galvanized tray (which is really a vintage maple bucket cover) to collect condensation from the perfect pitcher of easy white sangria.
We added a shelf underneath to store glasses and such and there is a spot underneath for a cooler or container to keep beverages on ice.
And we even added helpful details like a hook for a dish towel, a bottle opener and a hook for a wine opener. The towel hook is an old piece of hardware and the wine opener is hanging on a maple syrup tap, but any type of hooks would work.
So how did we put it all together? This project actually was much easier than I had anticipated. Basically, if you can handle simple wood cuts and handle a drill, you are good to go!
Step 1:
First you need to gather your materials. The only item that is essential is a door. Ours is vintage found at a yard sale years ago, but a new one would do just as well. We went in a rustic direction, but this could also be created painted out in one color or even a high gloss paint for a completely different look.
We used six spindles removed from our porch (another DIY project in the works), a shelf (again, ours is vintage found at a yard sale but new or made yourself would work as well), and then two sections of doors for the top and bottom of the work surface. We recently cut down some other doors to be used as desks (another DIY project upcoming), so we used those. However, once again, almost anything would work - scrap wood, planks of wood combined or even pallet wood.
Step 2:
Especially since our items were all vintage, we power washed everything first. We used a large piece of plastic underneath to collect any particles that fell off and could be dangerous to our sweet puppy. We then sanded everything down with a hand sander.
Step 3:
Begin assembling your parts. We laid the door down on two saw horses and then used right angle braces to line up the bottom shelf first. We came from underneath, drilled pilot holes and added screws from the back side of the door.
We added the spindles next by measuring out the spacing, drilling pilot holes and attaching screws from underneath. Since the back spindles touched the door we also drilled some screws from the back to strengthen them.
Using the right angle braces again, we attached the top shelf with screws from the back and straight down into each spindle.
We then added a new wood shelf underneath. We cut sections of additional spindles at a 45 degree angle, but any scrap wood would work. We drilled from the underside of the shelf to attach the bracket to the wood. We drilled in again from the back directly into the shelf and into the bracket as well.
Step 4:
Once it was all assembled, I did some dry brushing of paint on the spindles (they looked too new), the plain wood shelf and the bottom shelf (it was a little too high in contrast). I layered a few colors of chalk paint to best blend with the rustic finish of the door. Then I covered the spindles and all of the shelves in Annie Sloan’s dark wax. This gave an aged looked to the newer pieces, sealed the surfaces and unified all the pieces together. Because this piece is designed to be outside I was concerned that the wax finish might take a beating in the heat. To combat that and to seal the old finish of the door, I finished the whole piece in two coats of a spray poly.
And now you just need to move her in where you want her to go. I would suggest using some sort of anchor to ensure it doesn’t tip over.
Thank you so much for reading and I hope you too make your own customized outdoor bar!
If you are looking for some other outdoor projects, be sure to check out my DIY Vintage Mason Jar Solar Light and the fun space we created for our girls in our playhouse / pool house.
Sharing at Savvy Southern Style, Funky Junk Interiors, I Heart Naptime, The 36th Avenue and The DIY Dreamer
Thanks for reading!

